
 Back to blog

There are a handful of ways a Google Ads account bleeds money without you ever seeing it. I’m going to take them one at a time, one per article. This is Profit Leak number one, and it’s the first thing I fix in almost every account I take over.
It’s a small group of products that spend real money every month and lose it. Not many, usually a dozen or so. But they’re scattered across all your campaigns, so no single screen ever shows you the damage, and it just keeps going. If your overall ROAS looks fine but never quite gets better, there’s a good chance this is the leak you’ve got: a few products dragging the average down while Google keeps feeding them budget.
By the end of this you’ll have a repeatable quarterly cleanup that moves budget off the losers and onto your winners, with no per-campaign babysitting. I put every step on a one-page checklist you can print and run, and I’ll link it again at the end.
Why this leak hides
Shopping and PMax bid at the product level. But you manage your account at the campaign level. That gap is the whole problem.
Google is optimizing for its goal, not your margin, so a product can pull clicks, get the occasional sale, keep looking alive, and still lose you money every single month. And because those products are spread across several campaigns, there’s no one obvious place that adds up the damage. So it compounds.
That’s why the fix isn’t to hunt through campaigns. The fix is to judge every product once, in one list, and then act on it everywhere at the same time.
Part one: find the leakers
Go to all campaigns and make sure they’re all selected, enabled and paused. Then open Insights and reports, go into the Report editor, and pull up the Shopping products report.
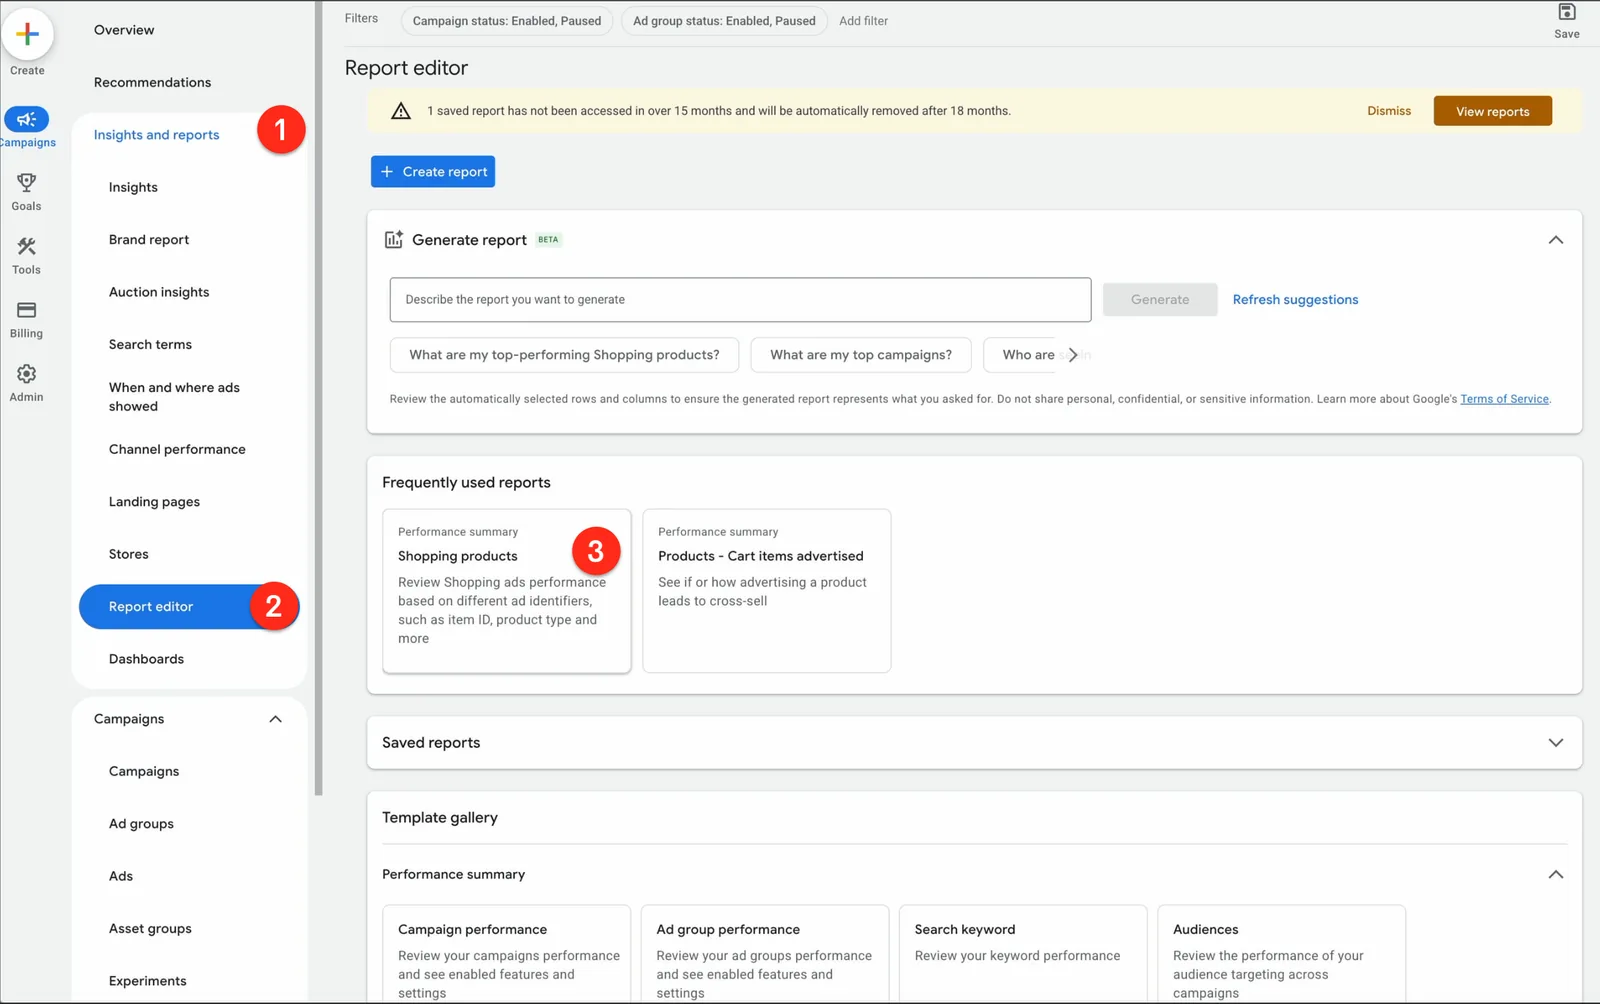
Set the date range to the last 90 days. Ninety days matters. It’s enough conversions that the numbers actually mean something, and it smooths over a slow week or a seasonal blip so you’re not reacting to noise. Leave the rows on item ID, so you’re looking at one line per product. For the columns, add the ones that tell the truth: conversions, conversion value, conversion value over cost (that’s your ROAS), conversion rate, and clicks. Then sort by cost, highest at the top, and read down from the biggest spenders.
Set your bars before you judge anything
There is no magic number here, it depends on the account. What you’re looking for first is enough data to trust the result. On the account I usually demo this on, that means a product needs at least 40 to 50 clicks, or it’s spent at least 30 to 35 dollars over the three months, before it even qualifies. Below that, there isn’t enough to judge, so those products keep their runway and you leave them alone.
For the products that did spend enough, look at ROAS first, and here’s a judgment call worth copying. This account’s target ROAS is 2.8. I’m not going to exclude everything under 2.8, that would be way too aggressive. I set the exclusion bar way down, around a ROAS of 1 or below. That’s conservative on purpose. At a ROAS of 1 the product is basically just paying for itself, so I’m only cutting the ones that are genuinely underwater. You can get stricter later, but start conservative.
Read down the list and collect item IDs
Reading down from the top, the obvious ones jump out. A product with conversion value over cost of 0.79 that spent 846 dollars is real money coming back at a loss. Grab that item ID. Keep scrolling: another at 1.1, another at 0.91, another at 0.45. You get the pattern, and you’re collecting item IDs as you go.
Watch what happens down near the spend floor, too. A product with 93 clicks and only one conversion had plenty of traffic to prove itself, and it didn’t. Another with 49 clicks and zero conversions, same story. This is the conversion-rate cut: the products that get clicks and almost never turn into a sale. They already had their shot.
The last filter is the human one
Before you lock the list, ask one question for each candidate: is there a reason the business wants this product alive anyway? Is it a brand-new launch that’s still learning? A loss leader on purpose? A hero product you protect for other reasons? If yes, it stays, even if the math looks bad.
And the runway rule cuts both ways. A product that spent 31 dollars on 48 clicks is right at the edge. It’s near the floor, but it’s such a small amount that I’d rather give it a little more time than cut it now. You’re not being ruthless, you’re being fair. What you’re left with is a short, honest list of item IDs.
Part two: apply the exclusion once
Take that list and tag it. Build a supplemental feed in Merchant Center that stamps a custom label on exactly those products, with a value like “excluded.”
Then apply it to the campaigns, and I’ll be straight with you: this next part is the one manual step, but you only do it once. In each of your Shopping and PMax campaigns, in every ad group or asset group, open your product listing groups. First, make a note of how you’ve currently got them split, say by product type. Then subdivide all products by that custom label, set the “excluded” value to excluded, and under everything else, rebuild the split you had before.
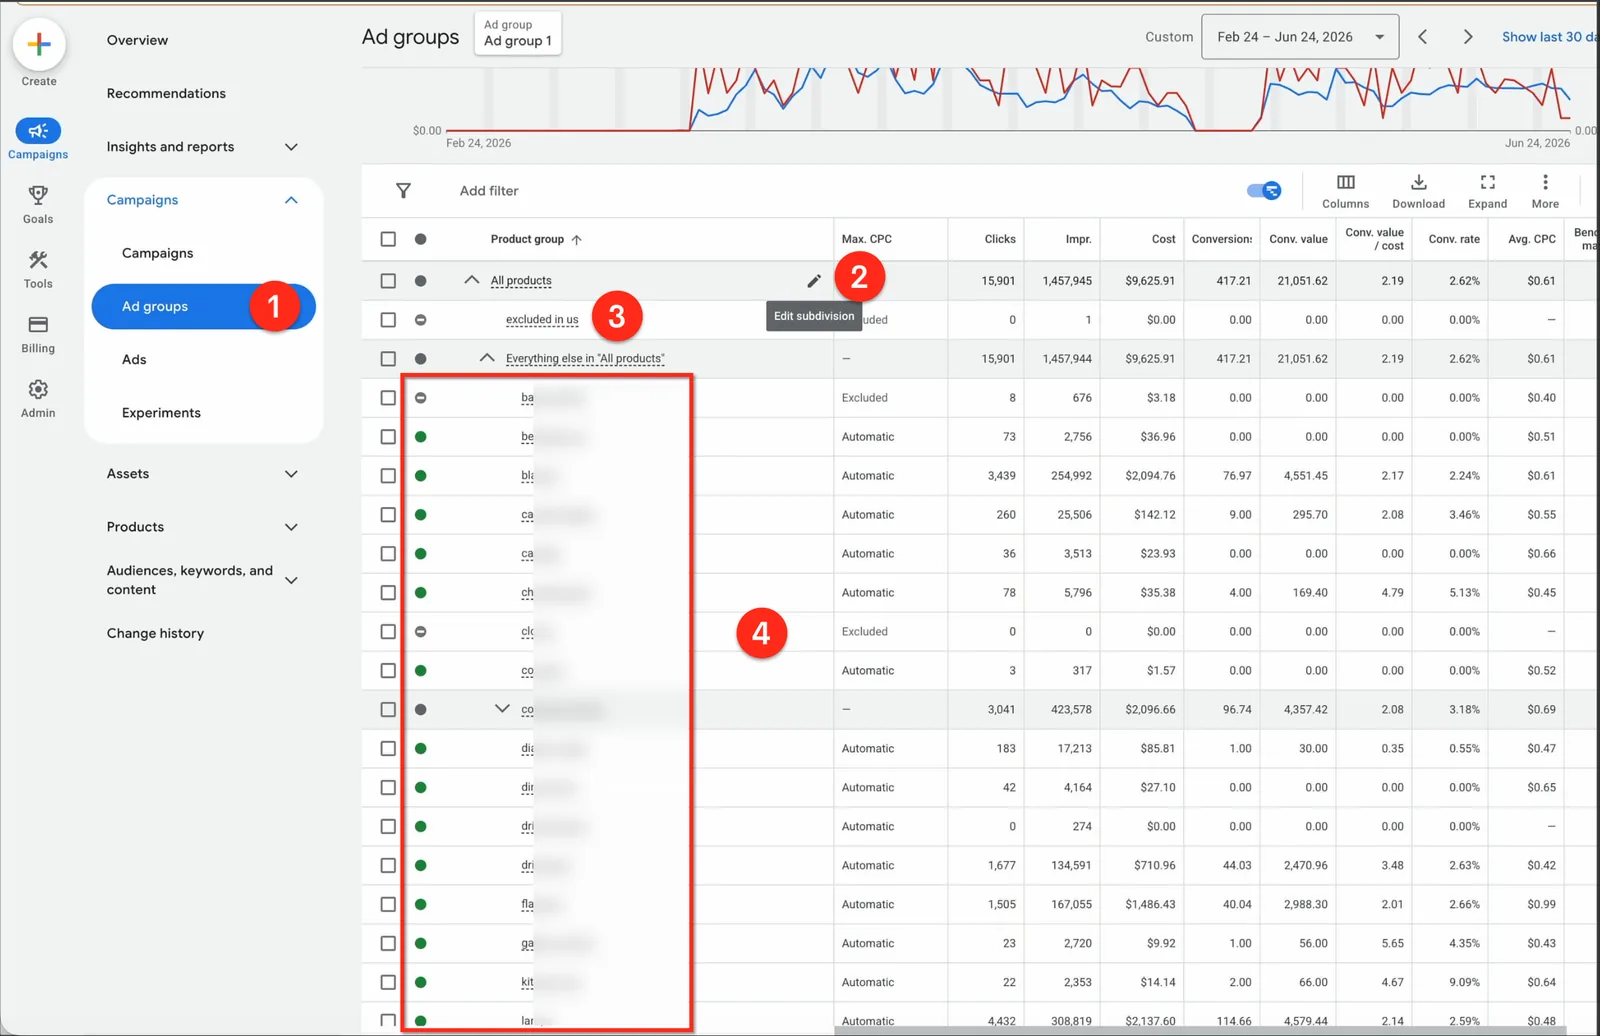
You set that up one time in each campaign. After that, it runs itself. From then on the exclusion follows the tag, not the campaign. Tag a product in the feed and it drops out of every campaign automatically. Untag it and it comes right back. You never go campaign by campaign again, you just manage one list in the feed.
That’s also why the custom label beats the two obvious alternatives. Pausing each product inside each campaign is manual, and you’d be back in there editing every time a product’s numbers change. Deleting the product from your feed is too harsh, you lose it from your free listings and your history too. The label you set up once, and after that it maintains itself.
Two safety nets, so excluded never means deleted
Excluding a product should never be a permanent death sentence. Always leave it a cheap way back.
Keep a catch-all campaign. Run one campaign with every product, including the excluded ones, on very low bids and a very low budget. Think of it as a cheap audition. A benched product still gets a small, controlled chance to prove it has potential, and it’s costing you almost nothing to find out. If one starts performing well in the catch-all, flag it at your next review and consider promoting it back. Excluded doesn’t mean deleted, it means it’s on the bench, not off the team.
Reactivate seasonal winners. Some products only earn their keep in one window a year. They’re dead for ten months, then sell like crazy in November and December. Before the high season starts, run a separate, high-season-only analysis: look at how those excluded products performed during that same season last year, and reactivate the ones that actually win right before the season kicks off. When it’s over, they go back on the exclusion list. Same system, just pointed at the right window.
Run it every quarter
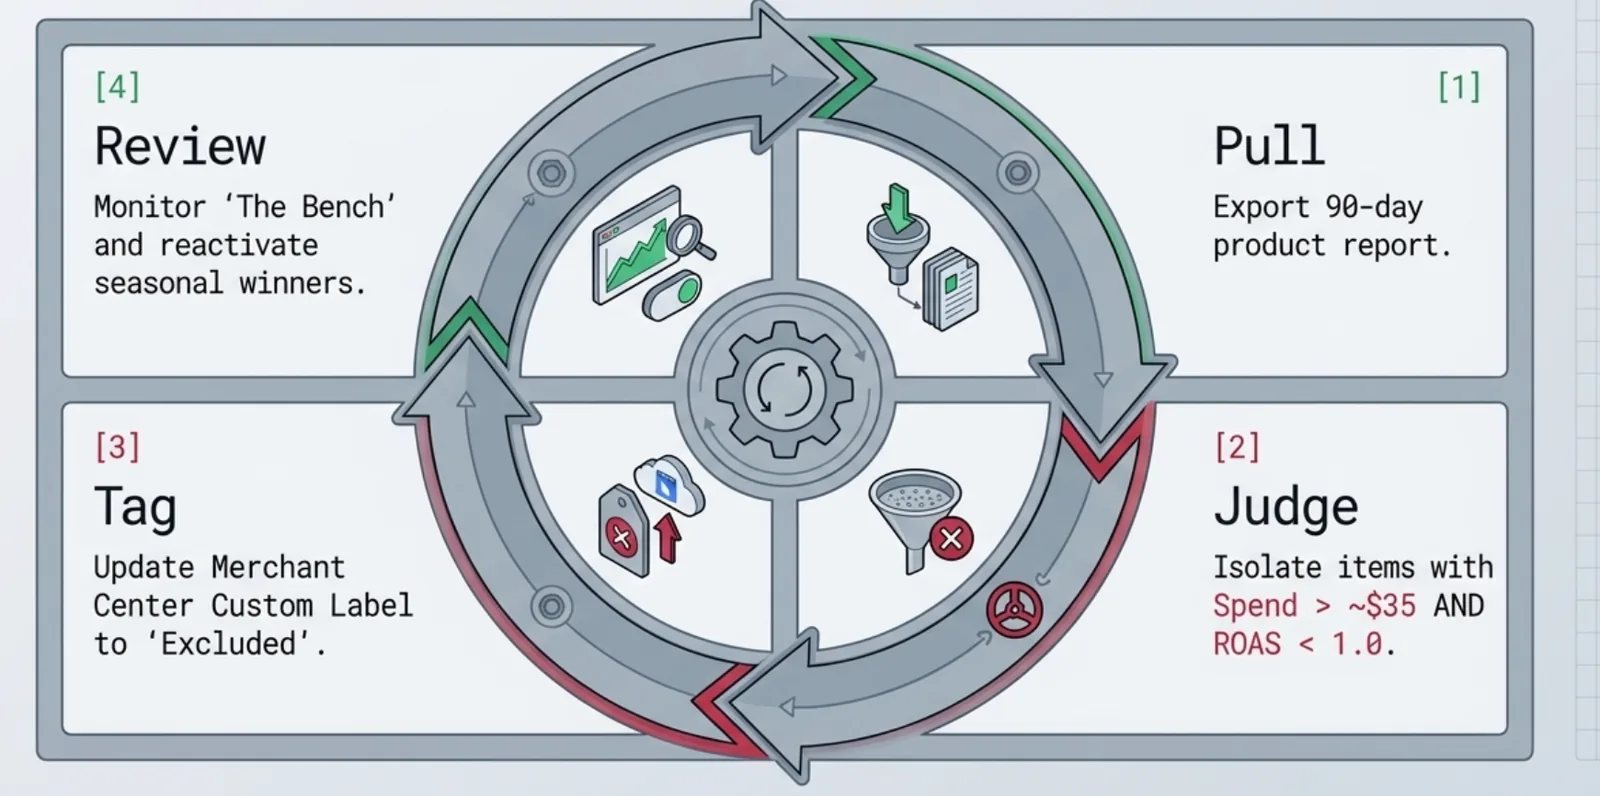
Here’s the recap. Pull your products across all campaigns for 90 days. Judge the ones that spent enough, on ROAS, then conversion rate, then a real business gut-check. Tag the losers with a custom label, and set that label to excluded in each campaign one time, so it stays automatic from then on. Keep a cheap catch-all so they can earn their way back, reactivate the seasonal ones before their season, and redo the whole thing once a quarter. Leakers can earn their way back, and new ones get caught before they cost you much.
I’ve put every step on a single clean page, in order, so you can just run it. Grab the one-page quarterly product cleanup checklist, print it, and stick it next to your screen.
That’s leak number one. There are more, and I’ll take them one at a time. If you want a hand finding the leaks in your own account, write to me.

Andrey Kisselev
With over 10 years managing 50+ accounts, he helps brands and DTC stores grow revenue efficiently through hands-on Google Ads management and practical advice.